Wednesday, July 15, 2020

Kayak trip to New Hogan Reservoir

I meant to visit New Hogan Reservoir for the first time in the spring this year, but the Coronavirus lockdown spoiled my plans, so I went in June (with the Eddyline Fathom LV) instead, and again in July (with the Oru kayak).

I was pleasantly surprised each time I went; New Hogan reservoir seemed nearly deserted - on  weekdays, in the summer after Labor Day - because the camp grounds were closed.  The water is warm, and there were long peaceful periods when I didn't hear PWCs, skiers, or motorboats, and didn't see any people.

These photos are from June and July.  If the boat launch would shut down it would be close to perfect, in spite of the low water level.

Stopped for lunch in a low-water peninsula.

Took selfies using a phone to trigger the camera.  This is supposed to be an animated GIF, but the timing info for the frames has been stripped from the image for no good reason, and it's not what I wanted.  

A coffee break on the north-east part of the lake.

Launch site near Coyote Point.


A rocky island in the lake.


Recommendations: visit in the spring, before Labor Day, in non-pandemic years.  If the campgrounds are closed, go during the summer; swim often, and bring extra drinking, water to deal to cope with the lack of shade when the water has pulled back from the treeline.  Avoid Wrinkle Cove, everyone goes there - try the Whiskey Creek Day Use Area, or go to Coyote Point and bring a cart to get your boat to the water.

The Whiskey Creek, Slate Creek, and Bear Creek arms of the lake (on the south end) are 5mph restriction areas, so they ought to be free from skiers and PWCs.  The south end of the Whiskey Creek arm has inlet tunnels under a road that that are big enough to paddle thru if the water is high enough.

Sunday, August 9, 2015

More kayaking gear for sale...

I need to raise about $1000 for some dental work that I need, so I'm selling the Looksha, the greenland paddle, probably the Snapdragon neoprene-GoreTex skirt, my camping gear, and anything else of value that I still own - unless I get a new job first.

(I have over 200 college credits, but I'm still a few classes short of a computer science degree, and one class short of the requirements for a minor in math.  I worked for a maritime museum for over a decade; some of my photographs have been used by the East Bay Regional Parks District, and I've sold a couple of others;  I have experience repairing cars, computer monitors, guitars, and other things; I have experience with small sailboats, windsurfers, canoes, and kayaks; I don't carry a cel phone - altho I could; and I am, therefore, an ideal employee in every way why don't you hire me for God's sake.)

Much of the stuff for sale will be on craigslist, and many things will be on eBay.  I'll be looking for an old kayak that no one wants that I can repair - please let me know if you have one.


Monday, January 26, 2015

The Tyne tandem is for sale

I've lost my extra storage space and the Tyne is the last of my project boats that has to go.  This kayak is 17' long and it weighs 80 or 90 pounds.  This might be a good boat for camping and fishing on flat water in warm weather, and probably not so good on rivers, or on the bay in windy (that is, summer) weather unless you can make or modify a spray skirt to fit it.  It doesn't include paddles but it might include the cart that I made for a canoe.  There are two seat backs but they aren't shown in the photos. 

The Tyne probably ought to be folded up and stored inside in cold or wet weather unless the wood parts have been refinished and the canvas has been treated with something to make it mildew resistant (or if the original skin has been replaced with a PVC skin).

The frame still needs some minor repairs: the new coaming board needs to be sanded or planed to make it thinner and more flexible; a crack in one of the floorboards needs to be glued up and maybe reinforced with a little fiberglass or some thin plywood.  One of the gunnels has a crack that should be reinforced with fiberglass or thin marine plywood.  There are a few other issues, none of which can't be handled be anyone with average DIY skills.


Skin repairs:  The skin is canvas with a waterproof coating from the gunnels down.  The stitching is broken in a couple of places, and the waterproof coating needs to be patched or filled with something like black 3M 5200, Sikaflex, etc.  (Aquaseal might work but I don't think it would be cost-effective.)   I was thinking about making a lightweight new skin for this boat as a practice run for making a skin for an aluminum-frame boat, but I probably will never get to it; you can find instructions for making a skin at Tom Yost's folding kayak site.


The wood frame needs some minor repairs, and it might have a cracked rib that should probably be glued closed and reinforced with fiberglass or thin marine plywood on one side.


None of the repairs require any special skills unless you want to restore the Tyne to it's original condition for some reason.  If I get around to making this boat completely seaworthy before I sell it I'll make seats from some type IV PFDs or a couple of old boogie boards attached to the frame with nylon straps so they don't slide.

Broken stitches.  I suppose I could use 3M 5400 or something like that instead of replacing the actual stitches, but I'll try stitching first if I ever get to it.
broken stitches


I might be willing to trade for kayak gear, and maybe for materials I can use to build a skin for a Yost Sea Tour aluminum-frame folder.  I'm in the SF east bay area.

Update: it's been sold.

Saturday, January 10, 2015

Kayak Paddle Bag

A paddle bag bag isn't a necessity, but it can be useful while schlepping all the gear from the apartment to the car and to wherever else it's going.  Most often I just put the bulky items (PFD, shoes, etc) into a plastic tub, and small items (clothes, camera, etc) into a canvas gear bag.  The gear bag goes on top of the tub and the paddle gets stuffed into the sides of the tub, so I can carry everything down to the street in one trip.  The problem is that the paddle ends hang up on everything and are just a nuisance.


The paddle bag should be something that can be slung over a shoulder, holds the paddles securely, and keeps the ends near the back of my head where they aren't too likely to get into trouble.  I've tested a variety of bags (day packs, duffels, chair bags, small guitar gig bags, a junior golf caddy bag, and others) from thrift stores and junk stores, and the leading candidate is...

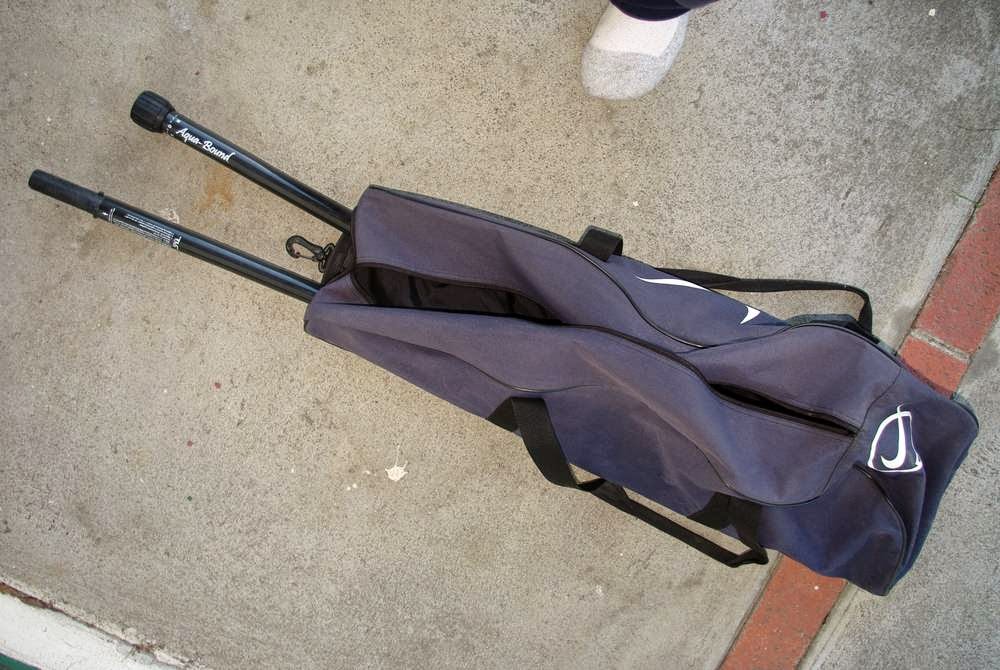
The Nike baseball bag

A couple of years ago I bought this heavily worn baseball bat-and-helmet-and-stuff bag that seemed like it could be re-purposed as a paddle-and-gear bag.  The bag is dirty and and the zipper is broken and it has a lot of small holes worn in it - but it only cost $1, so I thought I'd see how it worked out.


What made the bat bag useful is the pocket that runs the length of the bag (about 2.5') and is meant to hold one or two baseball bats.  The pocket opens at the end of the bag.  The rest of the bag holds everything else, so it isn't necessary to unpack gear to get at the paddles, or vice versa.   (On this bag the zipper on the gear compartment is missing the slide, and it won't really hold anything.  I was going to add snaps or some other simple fix, but haven't gotten around to it.  The bag might also benefit from a Scotch Guard or other water-repellant treatment.)

As it is the bat pocket (also missing a zipper slide) is just wide enough so that the paddle blades can be put in one at a time.  My Aqua-Bound StingRay paddle fits, but a river paddle, generic aluminum-shaft paddles, and probably any kayak paddle that isn't a skinny touring paddle or a greenland paddle will be too wide for this particular bag.  A different bat bag might hold wider paddles.

The is a plastic snap at the end of the bat pocket where one end of a shoulder strap could be attached.  I might add a grommet with a loop of cord sticking out to attach the other end of the strap.  (I might actually sew on a strap loop when I get a bag in better condition.)

The short version: the Nike bag seems to keep the paddle parts securely bundled and the ends together.  The paddles can be removed without unpacking anything else, and there's lots of room for other gear.  For paddles with skinny blades only.   Needs to have a shoulder strap added. 

The Nike bat bag
The Nike bag with a 2-piece touring paddle in the bat pocket.  The gear compartment is empty.

The Nike bat bag
The paddle fit in the pocket one at a time, and it seems like there's no danger of them sliding out unexpectedly.

The Nike bat bag bat\paddle slot
The paddle blades are about 6.25" wide.  A wider blade won't fit in the bat pocket.

The end of the bat pocket with its broken zipper.

This is a gig bag for a small guitar and it works with wider paddles than the Nike bag, but otherwise it just isn't as useful.
The First Act gig bag with the wood paddle.

Homemade paddles

I made a two-piece paddle back when I got my first kayak...
2-piece wood paddle
The closet-pole-and-plywood paddle.
2-piece wood paddle
Two-piece wood paddle.
I had some marine plywood leftovers from an old project, and I traced the blades from a Sevlor paddle onto a couple of those and cut out the blades, as seen in the photos.  The Sevlor was the only paddle I had owned, back then, and I really didn't know what I was doing.  Half of the original closet rod had to be thrown out, and the new rod doesn't seem to match the old one, so the paddle is probably unbalanced as-is.

I never finished fitting the both parts to the ferrule, so the paddle is unfinished and has never been used.  The current plan is to make the blades narrower, thin the shafts a bit, and reduce the overall length.  The blades are epoxied to the shafts, but I put stainless screws in to keep the blades firmly attached, and I guess I can get rid of those.
The plywood is discolored after being in a sometimes damp storeroom for several years.
The aluminum ferrule, which isn't finished either.
Paddle two is a homemade greenland paddle.  It's made with redwood from the local big-box home improvement store, and some walnut, maple, and birch scraps that had been hanging around.  I had some small teak scraps that went on the tips.  This one wasn't finished either, since I lost my workspace before I got around to doing the final shaping and putting on a finish.

Greenland paddle.  Looks nice, but I think I used too much hardwood.  I'm going to try and thin it carefully to make it light without being flimsy.

The homemade GP, still unfinished.  This was originally going to be a two-piece paddle, but  I changed my mind,  and ended up with a really ugly scarf joint in the middle of the shaft.

 I made these paddles without much woodworking experience to draw on, using ordinary hand tools for most of the work, in cramped conditions, so nothing was done in an afternoon, or even overnight, and neither paddle is likely to be finished soon.


Sunday, October 12, 2014

Point Molate as a kayak put-in

A year ago Richmond's Point Molate Park re-opened after being closed for 10 years.  I want to launch there sometime before the summer winds come back, and maybe paddle the length of the bridge.  I couldn't find any real information about paddling there, so I stopped at the park when I had a chance to see what it's like.

The short short version is:  you can use the park during daylight hours and launch from a sand beach, which may be hard to do when it's windy or when the water's low.  No fees, no running water.  It's near the freeway and easy to get to.


Accessible grill

Not very high, but steep enough to be a problem.

Kayak-resistant fence.

Wreck to the south of the park.
Pt. Molate park is about a mile and a half north of the Richmond-San Rafael Bridge Toll Plaza.  Park features are:
  • no entrance fee
  • open sunrise to sunset
  • no swimming, no fishing allowed
  • lots of room to park
  • restroom facilities are limited to one wheelchair-accessible latrine
  • no running water
  • several picnic tables in good condition and a small iron barbecue-grill-on-a-stick near each one
  • no lawn, and there's a lot of bare dirt, but there is some kind of springy turf in places and not too many weeds
  • trees, but little shade on the parking lot
  • blackberries - I saw a few blackberry vines, but didn't notice if there were blackberry thickets around
  • large sand beach with a short, steep bluff along most of it's length.
The shore at Pt. Molate.
The easy place to put the boat in: there is a gravel path about halfway between the park entrance and the latrine.  It leads from the parking lot to some railroad-tie steps that go down to the beach.  There is a sort of fence-lined walkway between the rest of the parking lot and the park that allows you to walk into the park but makes it difficult to bring anything bulky (like a kayak) with you, and the three-or-four foot high bluff will make it hard to get the boat to and from the water.

The gravel path is on the left before the sign.

Steps at the end of the gravel path.
The tide would have been at around 3' to 5' high when I was there, so I couldn't tell if launching at low tide would be a problem.  I suspect the bay adjacent to Pt. Molate turns into a mud flat when the water's really low and that it would be better to go to a nearby site to launch, especially when the summer westerlies are working.

The far end of the parking lot.


The shore just north of the park.
You probably won't encounter many small boats in this area, but there are the usual ships, ferries, and tugs to avoid.  I think the westerly wind and swells probably come onshore from the south-west, so it seems like kite boarders and windsurfers might want to use the place, but perhaps they are kept out by the "no swimming" rule.

Things to see on the water:
Panoramic view of the bridge from Red Rock.  Point Molate would be on the other side of the bridge on the far right of this image.
There are pretty views of the bay, the bridge, Mt. Tam, etc. from Pt. Molate.  The close scenery isn't all that pretty but it can be interesting - there are old wrecks and ruins, and abandoned wharves, for instance.

The bay around Pt. Molate.
Satellite view of the park, used without permission.
Getting to the park from the east bay is easy.  Exit i-580 west-bound just before the toll plaza and follow Stenmark Drive, and watch the signs.  Coming from the Marin side you probably have to exit at Pt. Richmond and then get back on the freeway west bound.

I'll try to make some kind of meaningful update to this entry when I finally get around to launching there.

Thursday, March 27, 2014

Homemade quick-release plate for a cheap tripod

I got the tripod for $2, so  I didn't want to spend $10 for a replacement quick-release plate.   (Note that used tripods will almost always be missing the QR plate, and so it's cost effective to get a used tripod if you're going to make the plate yourself; otherwise, you might as just as well buy a new one.)

Parts list:
  • a piece of some material about 1/4" thick cut to the size of the missing plate
  • 1/4-20 slotted flat-head machine screw, about 3/4" long
  • a neoprene washer, or part of an old inner tube, something like that

bottom of the plate with the counter-sunk screw

the completed QR plate

$2 tripod without a quick-release plate

Cheapy 'pod with the plate
I used wood for the plate because it was handy, but I would have used some expanded PVC (try the scrap box at a plastics dealer) if I could have found some in my junk box.  The bottom of the plate is countersunk so the screw head will be flush.

The thing on the right side of the plate isn't necessary if you cut the plate material to the right length the first time.


I used a phillips screw because that's what I had, but a 1/4" slotted screw can be tightened with a dime, or pocket knife, key, etc.  If you need to buy a screw save yourself some trouble and go to a real hardware store instead of a home-improvement place.  The screw needs to fit the camera, so bring that with you if you don't know what size threads it's tripod socket has.

Construction of the plate should be obvious: it should fit snugly between the two sides that are perpendicular to the bottom, and be tapered to fit under the wedgy lever and under the slanted thing on the other side.  Mine was constructed with part of a Popsicle stick because I didn't cut the wood to the right length to begin with, and adding it was easier than starting over. 

The neoprene washer (try the specialty bins at a hardware store) keep the screw from falling out and keeps the camera from pivoting around the screw once it's tightened down.  Part of an old inner tube or something similar would work, but I happened to have the washer.