Showing posts with label paddle. Show all posts

Saturday, January 10, 2015

Kayak Paddle Bag

A paddle bag bag isn't a necessity, but it can be useful while schlepping all the gear from the apartment to the car and to wherever else it's going.  Most often I just put the bulky items (PFD, shoes, etc) into a plastic tub, and small items (clothes, camera, etc) into a canvas gear bag.  The gear bag goes on top of the tub and the paddle gets stuffed into the sides of the tub, so I can carry everything down to the street in one trip.  The problem is that the paddle ends hang up on everything and are just a nuisance.


The paddle bag should be something that can be slung over a shoulder, holds the paddles securely, and keeps the ends near the back of my head where they aren't too likely to get into trouble.  I've tested a variety of bags (day packs, duffels, chair bags, small guitar gig bags, a junior golf caddy bag, and others) from thrift stores and junk stores, and the leading candidate is...

The Nike baseball bag

A couple of years ago I bought this heavily worn baseball bat-and-helmet-and-stuff bag that seemed like it could be re-purposed as a paddle-and-gear bag.  The bag is dirty and and the zipper is broken and it has a lot of small holes worn in it - but it only cost $1, so I thought I'd see how it worked out.


What made the bat bag useful is the pocket that runs the length of the bag (about 2.5') and is meant to hold one or two baseball bats.  The pocket opens at the end of the bag.  The rest of the bag holds everything else, so it isn't necessary to unpack gear to get at the paddles, or vice versa.   (On this bag the zipper on the gear compartment is missing the slide, and it won't really hold anything.  I was going to add snaps or some other simple fix, but haven't gotten around to it.  The bag might also benefit from a Scotch Guard or other water-repellant treatment.)

As it is the bat pocket (also missing a zipper slide) is just wide enough so that the paddle blades can be put in one at a time.  My Aqua-Bound StingRay paddle fits, but a river paddle, generic aluminum-shaft paddles, and probably any kayak paddle that isn't a skinny touring paddle or a greenland paddle will be too wide for this particular bag.  A different bat bag might hold wider paddles.

The is a plastic snap at the end of the bat pocket where one end of a shoulder strap could be attached.  I might add a grommet with a loop of cord sticking out to attach the other end of the strap.  (I might actually sew on a strap loop when I get a bag in better condition.)

The short version: the Nike bag seems to keep the paddle parts securely bundled and the ends together.  The paddles can be removed without unpacking anything else, and there's lots of room for other gear.  For paddles with skinny blades only.   Needs to have a shoulder strap added. 
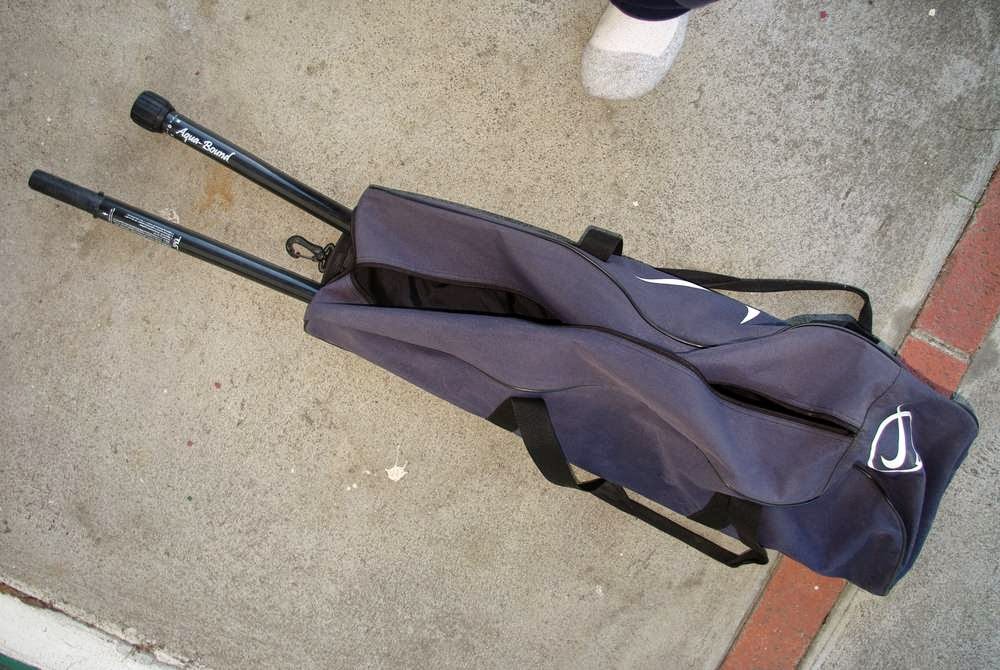
The Nike bat bag
The Nike bag with a 2-piece touring paddle in the bat pocket.  The gear compartment is empty.

The Nike bat bag
The paddle fit in the pocket one at a time, and it seems like there's no danger of them sliding out unexpectedly.

The Nike bat bag bat\paddle slot
The paddle blades are about 6.25" wide.  A wider blade won't fit in the bat pocket.

The end of the bat pocket with its broken zipper.

This is a gig bag for a small guitar and it works with wider paddles than the Nike bag, but otherwise it just isn't as useful.
The First Act gig bag with the wood paddle.

Homemade paddles

I made a two-piece paddle back when I got my first kayak...
2-piece wood paddle
The closet-pole-and-plywood paddle.
2-piece wood paddle
Two-piece wood paddle.
I had some marine plywood leftovers from an old project, and I traced the blades from a Sevlor paddle onto a couple of those and cut out the blades, as seen in the photos.  The Sevlor was the only paddle I had owned, back then, and I really didn't know what I was doing.  Half of the original closet rod had to be thrown out, and the new rod doesn't seem to match the old one, so the paddle is probably unbalanced as-is.

I never finished fitting the both parts to the ferrule, so the paddle is unfinished and has never been used.  The current plan is to make the blades narrower, thin the shafts a bit, and reduce the overall length.  The blades are epoxied to the shafts, but I put stainless screws in to keep the blades firmly attached, and I guess I can get rid of those.
The plywood is discolored after being in a sometimes damp storeroom for several years.
The aluminum ferrule, which isn't finished either.
Paddle two is a homemade greenland paddle.  It's made with redwood from the local big-box home improvement store, and some walnut, maple, and birch scraps that had been hanging around.  I had some small teak scraps that went on the tips.  This one wasn't finished either, since I lost my workspace before I got around to doing the final shaping and putting on a finish.

Greenland paddle.  Looks nice, but I think I used too much hardwood.  I'm going to try and thin it carefully to make it light without being flimsy.

The homemade GP, still unfinished.  This was originally going to be a two-piece paddle, but  I changed my mind,  and ended up with a really ugly scarf joint in the middle of the shaft.

 I made these paddles without much woodworking experience to draw on, using ordinary hand tools for most of the work, in cramped conditions, so nothing was done in an afternoon, or even overnight, and neither paddle is likely to be finished soon.


Friday, March 21, 2014

PVC camera stand sea trials

The cheesy new PVC camera stand got to go out on the strait with the new video camera.

Camera stand all the way forward.
It was too hard to reach the stand when it was under the foremost bungees, and it was almost in the way when under the bungees right in front of the cockpit.

All the way back.
It's hard to get the 1/4" camera-mount screw vertically aligned with the clamp, so the clamp is a bit to one side.  The stand ought to be a little higher so that the clamp isn't resting on the deck.


I can tell from the videos I took with the camera on the stand that it isn't entirely stationary.  This might be because the inner tube on the conduit elbow isn't glued down, and it's slipping.

I took the old Kodak EasyShare Sport, attached to a clip that fits on the end of the paddle, to see how it would work for self-portraits.  
Selfie-clip prototype II.


It needs some work -- the lens is so close to the paddle shaft that the paddle and drip rings intrude (and sometimes steal the focus), and the leash I had the camera on wasn't long enough to let me position the camera as far from the boat as I could.

Saturday, March 15, 2014

Canoe paddle

Another incomplete paddle.  If I ever have a real workbench again then maybe I'll finish shaping it and put some kind of finish on it, but I don't think I'll bother to finish this project until I get the canoe completely repaired.
Cedar, white pine or yellow pine, poplar, and I-forget-what-else, all salvaged.

Homemade paddles, another camera stand, & whatever

When I got my first kayak I tried making a spray skirt, even tho I really had no idea what I was doing, and I started making a homemade wood paddle, just for the sake of doing it, I guess.  I had only a slightly better idea of how to make a paddle than I had of how to make a spray skirt.

 The shafts are from closet poles, and are probably douglas fir.  The blades are from marine plywood left over from an old project, and the blades' shape was traced from a cheap aluminum paddle.  The blades are epoxied to the shafts, and have a few stainless wood screws as well.  A length of aluminum tubing from an old paddle if fitted to the end of one shaft so that I'd have a two-part paddle.  The wood finish is tung oil, and there's epoxy on the blade tips.

Although I started it a few years ago it's never been completed.  The shafts ought to be thinned, and maybe the blades should be reshaped, and I don't want to bother with it. 
The back of one paddle blade.

The unfinished wood paddle.
The aluminum tubing joint thing.  The inner-tube cover was meant to retain a pin or clip that would hold the other shaft in.
The marine ply I used was old and stained, but doesn't look too bad.

I started making a greenland paddle just so I could try using one when I was finished.  I used maple, poplar, walnut, and teak scraps that were already hanging around, but next time I won't use as much hardwood.  The redwood was from a local home-improvement place.


This paddle (like the other one) gets put aside for long periods, and probably won't be done anytime soon.


Ugly scarf joint.  If the paddle ever gets done I might put
something on the middle of the shaft to hide it.

The homemade spray skirt was put aside when I got a nylon touring skirt, and I've been waiting for another old wetsuit to come along so I'll have enough material to finish the waist. 

Homemade spray skirt (with a too-small tunnel) that came with my first hard-shell kayak.
Homemade, still unfinished, inside-out spray skirt made from an old wetsuit.

The camera stand should be plugged with some kind of closed cell foam so it will float.  I'll probably use some foam sheets from an old life jacket for that, and then test it to see if it's buoyant enough to keep the camera from sinking.  If it isn't I can add foam to the outside of the stand, or put the camera PFD on the camera's lanyard.

The steel spring in the cheap plastic C-clamp will probably be ruined by salt exposure, but the clamp was already broken, so I don't really care.  The camera will be closer to the clamp (and so a bit less prone to going out of alignment) when I find a stainless or nylon screw the right length.  (And a retaining clip to keep the screw from falling out.)

I could also put the bilge pump on the deck forward of the cockpit, and clamp the camera to that instead of using a stand.  I think the convenience of using the stand will offset the annoyance of having extra gear, and the camera won't be in the way if I need the pump.
Camera, clamp, and PVC stand.

By having the camera mounted on the clamp I can also clamp it to the end of
the paddle and use it for self-portraits at more than arm's length.
And there's other stuff that I just never bother to write up, like the kayak seat made from an old PFD, the Seascape .5 project boat, canoe repairs, the folding kayak project, and re-purposed gear.  Is anyone else interested in that?

Thursday, April 4, 2013

Spring button for a Sevylor kayak paddle

I obtained a two-piece aluminum-shaft Sevylor paddle that didn't have the usual type of spring button to connect the two parts, and the dome-shaped part that protrudes thru the two holes on the shafts was missing.  I'm posting my fix so that someone with the same problem will have at least one solution to try.
The "button" is a #8 or #10 stainless Allen-head cap screw.  (Tip: don't go to Home Depot, try your local hardware store.  If you need to replace the spring try the specialty bins at a large hardware store, or try using some spongy closed-cell foam instead.)
The screw head has to fit thru the holes on the paddle shafts, and the washer has to fit in the hole in the plastic part.  The total length of the screw is the same as the depth of the hole in the plastic part.

 
A bit of thread thick thread keeps the screw from springing out of the plastic thing and disappearing forever when the plastic thing is removed.  (Don't ask me how I know this.)  Some thick thread was wrapped around the screw threads and held on with a bit of vinyl tubing.  A small hole was drilled from the end of the black thing to the hole in it, and the thread was passed thru the hole.  It was tied around a bit of elastic cord to keep it from pulling thru the hole, and then was glued with Goop.

The screw head protrudes when the paddle is assembled, but not enough to be really annoying.  The screw head could be ground to a rounder shape to make it more flush
Update: be sure the screw is securely tethered to the plastic, maybe with heat-shrink tubing or epoxy, because the screw is going to try to escape sometime when you've forgotten all about it.  A tiny hole thru the screw head into the socket would provide an ideal place to secure the thread (maybe with a stopper knot on each end), but I haven't got the patience or the proper equipment for the job.

Friday, November 9, 2012

Folbot Super paddle repair notes

I'm blogging my notes in case they're any use to someone else who's got an old Folbot to fix up.  I'll blog repair notes for the Tyne tandem folder when I remember to take some photos. 
The Folbot paddles.
 I got two two-part kayak paddles with the Folbot.

One paddle blade was beginning to separate from its shaft, making that paddle unusable.  Both paddles have chipped varnish and some mildew stains on the wood.  Each blade has a thin aluminum sheath folded onto and riveted to the end, and these are corroded inside and out, sometimes to the point that the rivets are beginning to fall apart.

The aluminum sheath on the end of the paddle blade.

I removed the partially-detached blade by using a heat gun to to warm up the glue as I pulled the blade away from the shaft.  I think the other three blades will have to be re-glued to the shafts so that they don't fail at some inconvenient time. 
The cleaned and partially sanded blade.
The aluminum sheath.
The detached blade minus its sheath.  You can see a little of the old glue where the shaft was.
I removed the sheath from the loose blade by breaking off parts of the rivets with pliers, drilling out the shafts as needed, and so on.  I scrubbed the blade with a nylon brush and water to get as much of the white corrosion gunk off as I could, then began sanding to get at the rest of it.

The blade is going glued back on to the shaft once the end has been sanded to remove the varnish.  I'm going to use epoxy (mixed with dark sawdust) to fill the holes and the small cracks between the holes and the blade end (probably) wrap the blade and shaft ends with fiberglass tape.  The blade will be re-varnished as needed once the shaft is ready to be varnished.

Fiberglass tape.  This seems to be easier to work with than strips of fiberglass cloth, which can fray badly at the edges and make a mess if you aren't careful when you are adding the epoxy.
 The varnish on the shaft is chipped and damaged in places, especially at the end of the ferrule.  I took the ferrule off to make it easier to sand off the varnish.  The ferrule is held on with a pin and by the indentation where the pin was driven in.  I pulled the pin in the photo out with my fingernails and some needle-nose pliers and then I drilled out the hole to remove the indentation so that I could pull the ferrule off.  I could use a brass or stainless flathead screw when I put the ferrule back on--maybe with some kind of coating to keep the dissimilar metals from corroding--or I could drill a new hole for the pin and pound it back in, then fill the old hole with epoxy.

The inside end of the shaft and its bronze ferrule and retaining pin.
I'll probably re-varnish the shaft before I glue the blade back on--that might make it easier to clean up the excess glue.

I'll post some notes about minor problems with the tubes, the wood frame parts, and the seats another time, and I might post about the carry bags and other trivial stuff if it seems like there is any interest.