Monday, September 6, 2010
Another flash demo
This is another demo that Blogger won't show as a flash animation, so I'm using an AVI file, which means that the animation is shrunken, overcompressed, and generally screwed up for your pleasure. The actual flash would load a lot faster, look a lot better, and suck a lot less - you get the idea.
This was an assignment for a computer graphics class at SFSU. The buttons were links to my resume and to other things on my SFSU website. The music was stolen from the New Orleans Klezmer All Stars (by was of a CD from the library).
This demo never got finished, and now I don't know what to do with it - might as well put it on the blog.
Saturday, September 4, 2010
Animated head demo
Blogger can't seem to cope with SWF files, so I've uploaded an AVI file instead; as a result, this seems to suck more than it really does.
This demo was only meant to animate my avatar's features - it isn't trying to communicate anything. I thought if I had a beard I wouldn't have to figure out how to animate the mouth.
Wednesday, August 11, 2010
Shopping for cheap groceries
I spend more time than necessary shopping for cheap food, and I think I'm good at it. I sometimes think that I should write up a guide to buying cheap eats in my area (Western Contra Costa County, CA) because I see so many people who don't seem to know how to do it. I've seen people at the dollar store with 50 items in their cart, most of which are junk: frozen meals, for instance, which aren't a good value to begin with, and which are probably cheaper (by weight) at Grocery Outlet or FoodMaxx.
I suppose this has been done elsewhere, but I guess that's no reason not to do it myself, if I think anyone will be interested.
I suppose this has been done elsewhere, but I guess that's no reason not to do it myself, if I think anyone will be interested.
Sunday, July 18, 2010
Circumnavigation of the Marin Islands
I completed a complete circumnavigation of the majestic Marin Islands today, a journey that's never been attempted (in my kayak) before. Most of the photos were ruined by water on the front of the waterproof camera bag; please try to curb your disappointment. That's West Marin Island below.

The white blobs on the trees in the photo below are egrets.

This is the bow of my kayak at the Loch Lomond marina. My boat was out of place there - since it was being used, and the other boats were just sitting and generating bills. It's funny, but I didn't see anyone laughing at the irony of it.


The white blobs on the trees in the photo below are egrets.

This is the bow of my kayak at the Loch Lomond marina. My boat was out of place there - since it was being used, and the other boats were just sitting and generating bills. It's funny, but I didn't see anyone laughing at the irony of it.

Tuesday, June 22, 2010
Emergency gear
I began making a tw0-piece kayak paddle out of some old marine plywood and a couple lengths of closet pole. One of the poles turned out to have a big crack in it, so what I have so far is a single-blade paddle that I'm going to try to stash under the deck behind the cockpit. It has a tung oil finish and epoxy on the end of the blade.
 The accessory du jour is a set of shock cord and straps aft of the cockpit to hold a paddle float and to hold the paddle during self-rescues.

 The accessory du jour is a set of shock cord and straps aft of the cockpit to hold a paddle float and to hold the paddle during self-rescues.
Saturday, June 19, 2010
The spray skirt so far
Here's the partially completed spray skirt on the cockpit of the boat, supported by a cardboard box that has a yellow life vest over it.

I didn't plan carefully enough before I trimmed and glued the edges, and I had to add more material so that it wouldn't sag in the front. As a result it's uglier than it needs to be.
Next, I have to figure out what to do with the top of the tunnel. I might glue another slab of neoprene onto the back to make it as high as the front, or I could cut down the front and make some kind of zipper stop so the slider thingy doesn't get lost.
Edit, October 2011: I put this project aside for some reason, and forgot all about it. I was thinking recently that it would be nice to have a neoprene spray skirt for cold or rough conditions... and I finally remembered that I already have one, almost. With any luck it will be done before winter, and I can post the details on this blog.

Edit, March 2013: I really didn't know what I was doing when I started this project, and I never had enough neoprene to finish it, so the project was put aside and forgotten. I sold the kayak that the skirt was made for (and forgot to give the skirt to the buyer), and it doesn't fit the kayak I'm using now, so I doubt that it will ever be finished, especially since now it doesn't seem to have been such a good idea in the first place. I might use some of the neoprene to make knee pads and seat cushions for another old kayak.
Neoprene (in good condition) from an old wetsuit (or from an old pair of neoprene waders found at a thrift shop) might work as well as new material if you follow other online instructions (like these), which is what I should have done to begin with. This skirt happens to fit one of my project boats, so I may turn it into a zippered cockpit cover.
Wednesday, June 16, 2010
Homemade neoprene spray skirt
I was going to make a nylon spray skirt, and then I found one that cost about $20 after shipping from Sierra Trading Post, and I got that instead. In the meantime, the neoprene skirt I was using just fell apart one day, so I'm making a neoprene spray skirt from an old wetsuit. The wetsuit was provided by Peter at the Cal Sailing Club (after I posted a wanted ad on the Freecycle mailing list).
 What you see in the above photo is the forward portion of the spray skirt. It's made from the front of the wetsuit and includes the zipper. Some of the edges have been glued to hold the shock cord that will hold the skirt in place.
 The second photo shows the aft portion of the skirt, prior to being trimmed and glued for the shock cord. Packing tape is going to be used to hold everything in place while the glue dries. I'm using Aquaseal instead of neoprene cement because I already had the Aquaseal.
The two parts of the spray skirt are going to be trimmed and glued together. Then I'm going to have to figure out how to finish the top of the torso part - maybe with shock cord or a drawstring, or I might roll the edge and glue it to itself to make it more durable.
Thursday, June 10, 2010
Strap-on kayak skeg sea trials
I took the kayak to the public boat launch ramp at the Berkeley marina's south basin. It was windy enough that the windsurfers were out, it was hard to make any headway to windward, and the waves were big enough to bury the boat's bow a couple of times.
The skeg worked the way I hoped it would, rather than the way I expected it to. Tracking was greatly improved, but not so much that the boat was painfully hard to turn. After about an hour and a half in the water I pulled the boat out and found that the skeg still seemed to be exactly where I had put it; I had thought that it would get pushed out of alignment after a while.
The next step is to try a shallow-draft skeg that would work when the boat is launched from a beach.
Sunday, June 6, 2010
Strap-on skeg
The strap-on skeg is meant to be a temporary means of improving the kayak's tracking.
 It probably ought to be shorter and wider, but the shape was dictated by birch plywood scraps that I had. It has two pieces of 1/8" braided rope that pass thru the skeg and that have a loop tied at each end. The loops hook onto a pair of shock cords that are held on the deck with nylon straps. I don't yet know if this will work at all when the boat's in the water and under way.
 The skeg in place
The skeg's bottom plate is coated with Goop to make a rubbery, sticky surface that won't slide. The tip is coated with Goop because it's more durable that the oil finish on the rest of the skeg. Goop was also used to fill various nooks and crannies and to glue the rope into place.
The skeg in place
The skeg's bottom plate is coated with Goop to make a rubbery, sticky surface that won't slide. The tip is coated with Goop because it's more durable that the oil finish on the rest of the skeg. Goop was also used to fill various nooks and crannies and to glue the rope into place.
Once I've got this working (or when I just give up on it) I'm going to start making a waterproofed-nylon spray skirt.
(December 2012: this skeg is too deep to use in most conditions. I've been making a much smaller strap-on skeg for another kayak, and it seems to work fine. My current kayak has a rudder that I use as a drop skeg when it's windy.)
 It probably ought to be shorter and wider, but the shape was dictated by birch plywood scraps that I had. It has two pieces of 1/8" braided rope that pass thru the skeg and that have a loop tied at each end. The loops hook onto a pair of shock cords that are held on the deck with nylon straps. I don't yet know if this will work at all when the boat's in the water and under way.
 The skeg in place
Once I've got this working (or when I just give up on it) I'm going to start making a waterproofed-nylon spray skirt.
(December 2012: this skeg is too deep to use in most conditions. I've been making a much smaller strap-on skeg for another kayak, and it seems to work fine. My current kayak has a rudder that I use as a drop skeg when it's windy.)
Friday, June 4, 2010
The kayak
I've been given this old fiberglass kayak. It was homemade a couple of decades ago, and now much of the gelcoat is missing, and it has duct tape on it that's been there for 20 years. There are foam blocks inside of it that hold up the deck and are probably meant to make the hull stiffer; those blocks are all out of wack. The bungee on the deck is new, and the flotation bags still work.
The seat isn't attached to the bottom of the hull, and it's probably supposed to be. There are adjustable foot pegs that still work, although they're hard to reach.
The boat came with two nearly-worn-out spray skirts, and I've got to figure out how to repair them or make a new one.
 Tracking seems to be terrible, tho I'm not sure that it isn't just because I'm a beginner, and because I'm using it on open water instead of on a river. I'm working on a strap-on skeg to help with that.
A really cheap kayak cart

A quick google of "kayak cart" shows that the cheapest one cost $60, and most of them are over $100 - so forget that. I decided to make my own, and I did, and that's it in the photo.
The construction should be almost self-explanatory: a pair of training wheels from Thrifttown ($1) are bolted onto PVC t-connectors, and the rest is made from tees and thick-walled PVC pipe, and a "pool noodle." If it seems like it needs a stronger frame I'll add another crosswise pipe to it.
Improvements: I suppose the tees can be joined to the pipe sections with clevis pins to make a cart that can be disassembled. If the wheels were closer together then the thing could be turned upside-down and used to load the kayak onto the car. Bigger wheels would make the cart more usable on lawns, beaches, and gravel roads, but as it is it's only useful on hard, flat surfaces.
Materials:
- training wheels from the thrift store or flea market
- four 3/4" PVC tees
- one pair each of 3/4" x #14 machine screws, nuts, and washers
- glue (I used Plumber's Goop), clevis pins, or sheet metal screws to join the PVC parts
- pipe insulation, pool noodle, or other foamy cushioning thinger
 Edit, October '11: This thing is usable, but it really needs to be sturdier, and the padded parts should be farther apart. PVC cement would be best for permanently joining the PVC pipe and couplings, but I don't like to buy that stuff--most of it ends up sitting in the can until it goes bad.
December 2012: If you make one of these, plan to make a better one and keep your eye out for a bigger pair of wheels and some aluminum tubing from an old pair of crutches or something. A jogging stroller with an aluminum frame is a good source of parts.
Thursday, June 3, 2010
Simple DIY paddle leash
A paddle leash is meant to keep the paddle attached to the kayak. This particular paddle leash is meant to be cheap and simple.
Materials:
The knot links all go to the Animated Knots By Grog website.
To make the paddle leash: tie a figure-eight loop near one end of the cord, like the one on the left side of the first photo. Tie a stopper knot into the loose end of the cord, as seen on the right side of the photo. (If you use 1/8" cord then a monkey's fist might work better than a stopper knot, if it's tied compactly. A monkey's fist in 1/4" cord would probably be too bulky to be practical.)

The loop should be a bit smaller than the stopper knot, but large enough that the stopper knot can be pushed thru it. There should be enough cord between the two knots to go around the shaft of the paddle.

The second photo shows, more of less, how it works. The end of the cord goes around the paddle shaft and the stopper knot is pushed thru the loop. This should keep the leash on the paddle, and should be easy to release in an emergency, although I haven't really tested this yet.

The other end can have the same arrangement, or a plastic shock-cord hook, or just a large knot that goes under a deck bungee. If you want to keep it really simple, just tie it to the deck with a bowline.
The super-cheapskate way to do this would be to use a loop of shock cord (or some rubber bands) held by a knot in the thin rope that would be used for the rest of the leash.
The loose end of the shock cord has heat-shrink tubing and a bit of Aquaseal over it. The other end has a plastic snap from Narain's in Berkeley. The plastic snaps can be hard to find (search on "shock cord hooks"), and you may want to just get a stainless steel snap off the shelf at a good hardware store. (The super-cheapskate might want to settle for a metal snap from a dollar-store dog leash, or another loop-and-knot combo.)
Update: the leash can be hard to attach to and remove from the paddle for someone who isn't familiar with it. It can also be tricky to remove even after it's familiar, so in an emergency it would be easier to remove the bungee hook rather than undo the loop-and-knot -- if there's a choice in the matter.
Materials:
- a few feet of 1/4" or 1/8" shock cord from REI, West Marine, or from a hardware store
- a plastic shock cord hook (optional)
The knot links all go to the Animated Knots By Grog website.
To make the paddle leash: tie a figure-eight loop near one end of the cord, like the one on the left side of the first photo. Tie a stopper knot into the loose end of the cord, as seen on the right side of the photo. (If you use 1/8" cord then a monkey's fist might work better than a stopper knot, if it's tied compactly. A monkey's fist in 1/4" cord would probably be too bulky to be practical.)

The loop should be a bit smaller than the stopper knot, but large enough that the stopper knot can be pushed thru it. There should be enough cord between the two knots to go around the shaft of the paddle.

The second photo shows, more of less, how it works. The end of the cord goes around the paddle shaft and the stopper knot is pushed thru the loop. This should keep the leash on the paddle, and should be easy to release in an emergency, although I haven't really tested this yet.

The other end can have the same arrangement, or a plastic shock-cord hook, or just a large knot that goes under a deck bungee. If you want to keep it really simple, just tie it to the deck with a bowline.
The super-cheapskate way to do this would be to use a loop of shock cord (or some rubber bands) held by a knot in the thin rope that would be used for the rest of the leash.
The loose end of the shock cord has heat-shrink tubing and a bit of Aquaseal over it. The other end has a plastic snap from Narain's in Berkeley. The plastic snaps can be hard to find (search on "shock cord hooks"), and you may want to just get a stainless steel snap off the shelf at a good hardware store. (The super-cheapskate might want to settle for a metal snap from a dollar-store dog leash, or another loop-and-knot combo.)
Update: the leash can be hard to attach to and remove from the paddle for someone who isn't familiar with it. It can also be tricky to remove even after it's familiar, so in an emergency it would be easier to remove the bungee hook rather than undo the loop-and-knot -- if there's a choice in the matter.
Wednesday, May 19, 2010
West County put-ins, continued
This is the little park next to the water treatment plant in Rodeo. There's room for three or four cars at most. This area is gated off at 4pm (or thereabouts), and the only way to get out is to crash thru a heavy gate or a couple of cyclone fences.

There may be some homeless people camping at the south end of the beach here.
 The beach at the little park in Rodeo.
This launch ramp at the Rodeo marina is probably only useful to anyone when the tide is high. I don't think there are any launch fees.
 The launch ramp at the Rodeo Marina at a medium-low tide.
At Bayfront Park in Pinole it can be difficult to get to the water at low tide. The area you see in the image below is usually under water and the creek is only a few inches deep. There's a rocky-gravelly-muddy area to the right of the creek where you can reach the water (at low tide), but I think you would still have to wade out a long ways to have enough depth to launch a kayak.
 Bayfront Park mudflats.
Ferry Point, Richmond
This is the small beach near Ferry Point at the Miller\Knox Regional Shoreline in Richmond. There's a small parking lot and very limited street parking adjacent to the beach. I'd guess that afternoon winds would make launching the kayak more difficult here.


Thursday, April 8, 2010
More put-ins
(This is a work in progress. Suggestions are welcome) Here are (or will be) some more potential and underdocumented places to put in kayaks and canoes. I don't have any experience paddling at these places - I don't much experience paddling at all - so take everything with a grain of salt.
American Canyon
There is a place on the Napa River a bit more that a mile north of the highway 37 bridge, and a bit less than a mile south of the remains of the USS Corry, where a residential area abuts a short slough that connects to the river. I only know this spot from the Google satellite map; I haven't had a chance to go there yet. It seems to me that if there isn't a fence there, one could park on Catalina Circle and launch in the slough next to the road. This is probably a place to avoid at low tide.
Eckley Pier
 The south side of the Carquinez Strait
The Eckley pier is on the south side of the Carquinez Strait, west of Port Costa. It's accessible from the Carquinez Strait Regional Shoreline's Bull Valley Staging Area. There's a picnic area, lots of parking, and a fishing pier. There are rocky or gravely beaches on the Carquinez Strait to either side of the pier. There are hundreds of old piles from ruined wharves, and there are the remains of a side-wheel ferry.
 The remains of the Garden City, and the Eckley pier
There is no boat dock. To launch here you would have to cross the train tracks (Amtrak and other trains pass frequently) and find a rock-and-pile-free spot to launch on the shore; there's a small beach next to the pier (shown in the photo above) that I think would be usable when the tide's in. The shore east of the pier is lined with rip-rap, so launching there is going to be difficult or impossible.
Conditions here are much like they are at Port Costa.
Point Pinole Regional Park
I don't think launching is allowed here, but - I think there are beaches (like the one shown below) near the north-east corner of the park that may be accessible from nearby neighborhoods.
 Another San Pablo Bay beach
You can reach the beach shown above with a five-or-ten minute walk from a parking lot over asphalt and dirt trails, and over some train tracks. I'm going to go back and take another look around to see if there's street parking near there, since the little regional park parking lot tends to fill up.
Alhambra Creek
 Paddlers on Alhambra Creek
Alhambra Creek becomes a tidal slough when the tide is in, and it might be possible to put the kayak in at the creek on the south edge of the Martinez Regional Shoreline, next to the Grainger's Wharf parking lot at the end of Berrellessa Street. There's a muddy bank to cope with, so it might be a better idea to hike to the small beach on the strait (near the remains of the Forester), or to launch from the marina.
There is a restroom and running water at Grainger's Wharf.
 Bridge over Alhambra Creek at Grainger's Wharf
 Bridge over a tiny slough adjacent to Alhambra Creek
The bridge in the picture immediately above crosses a tiny slough that joins Alhambra Creek at one end and disappears in the marshes at the other end. It seems like it ought to be possible - when the tide's in - to paddle under the bridge and a few yards up the slough, and find a spot to sit and take pictures of the birds in the tules.
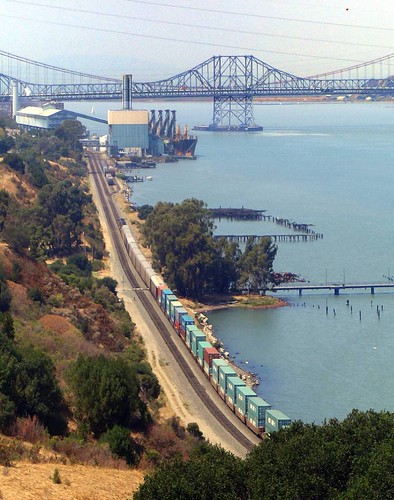
Potential kayak put-ins on San Pablo Bay and San Francisco Bay
I've been trying to figure out where I could launch a kayak in Western Contra Costa County. The following is a short list of the places that I might try.

 Lone Tree Point
Rodeo, Lone Tree Point
there is a small regional park on the San Pablo Bay shore here with a small sandy beach. There is room for several cars to park by the park entrance. There's an outhouseand running water, and that's it for facilities.
The beach remains sandy when the tide is out, and I think the water is still deep enough to allow launching.
I've seen someone launch a kayak here; he uses a dolly to get his boat to the beach, maybe from the neighborhood adjacent to the park.
Lone Tree Point photos: http://www.flickr.com/search/?q=lone%20tree&w=24215152%40N04
 The Rodeo marina
The Rodeo marina
The Rodeo marina seems to be silted in, and impassible at low tide. You might just as well launch at Lone Tree Point.
Rodeo, a bit north of the marina
There is small piece of regional park land, with parking for three or four cars, and another small sand beach. I've seen someone windsurfing here, but I don't know if it's passable when the tide's out. There are no facilities.

 Low tide at the mouth of Pinole Creek
Pinole, Bayfront Park
Bayfront park is (I think) a city park surrounded by regional park land, on the east shore of San Pablo Bay. There's a sandy beach when the tide's in, and a whole lot of mud when the tide's out.
 Bayfront Park beach at low tide
 Pinole Creek at high tide
There is a crumbling boat launching ramp on Pinole Creek at the north end of the park, and it might be usable when the tide is in. Where the creek joins the bay there is a gravely-rocky beach that might be usable in a pinch. A bit to the north of the park, there is a sandy beach across the tracks from a residential block, and like the rest of the area it's probably too shallow to be usable when the tide's out.
 The Albany Bulb beach
Albany, the Albany Bulb beach
At the north-west corner of the Golden Gate Fields lot there is a beach that's popular with dog-walkers and kitesurfers. It seems like it should be usable when the tide's out, and it might be somewhat sheltered from the chop that comes with the afternoon wind. There's plenty of room to park, and I think it has an outhouse and a water tap.
Lone Tree PointRodeo, Lone Tree Point
there is a small regional park on the San Pablo Bay shore here with a small sandy beach. There is room for several cars to park by the park entrance. There's an outhouse
The beach remains sandy when the tide is out, and I think the water is still deep enough to allow launching.
I've seen someone launch a kayak here; he uses a dolly to get his boat to the beach, maybe from the neighborhood adjacent to the park.
Lone Tree Point photos: http://www.flickr.com/search/?q=lone%20tree&w=24215152%40N04
The Rodeo marinaThe Rodeo marina seems to be silted in, and impassible at low tide. You might just as well launch at Lone Tree Point.
Rodeo, a bit north of the marina
There is small piece of regional park land, with parking for three or four cars, and another small sand beach. I've seen someone windsurfing here, but I don't know if it's passable when the tide's out. There are no facilities.
Low tide at the mouth of Pinole CreekPinole, Bayfront Park
Bayfront park is (I think) a city park surrounded by regional park land, on the east shore of San Pablo Bay. There's a sandy beach when the tide's in, and a whole lot of mud when the tide's out.
Bayfront Park beach at low tide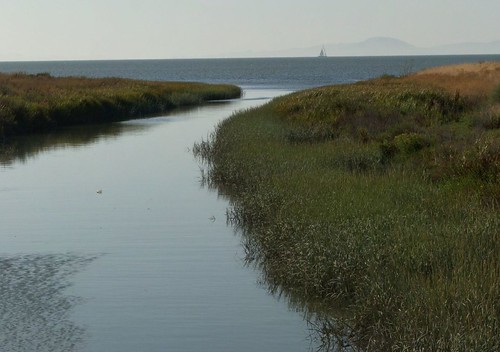 Pinole Creek at high tide
 The Albany Bulb beach
At the north-west corner of the Golden Gate Fields lot there is a beach that's popular with dog-walkers and kitesurfers. It seems like it should be usable when the tide's out, and it might be somewhat sheltered from the chop that comes with the afternoon wind. There's plenty of room to park, and I think it has an outhouse and a water tap.
Subscribe to:
Posts (Atom)
